
Vehicle promo stickers give your business a practical way to add a logo, company name or contact details to a car, van or truck. They can help customers recognize your brand on vehicles that have been serviced, on shop vehicles, or in everyday local driving.
For garages, dealerships and service businesses, larger promo stickers are often a better fit than very small logo decals. The key is to choose a suitable size and material, keep the message easy to read, and apply the sticker to a clean, appropriate surface.
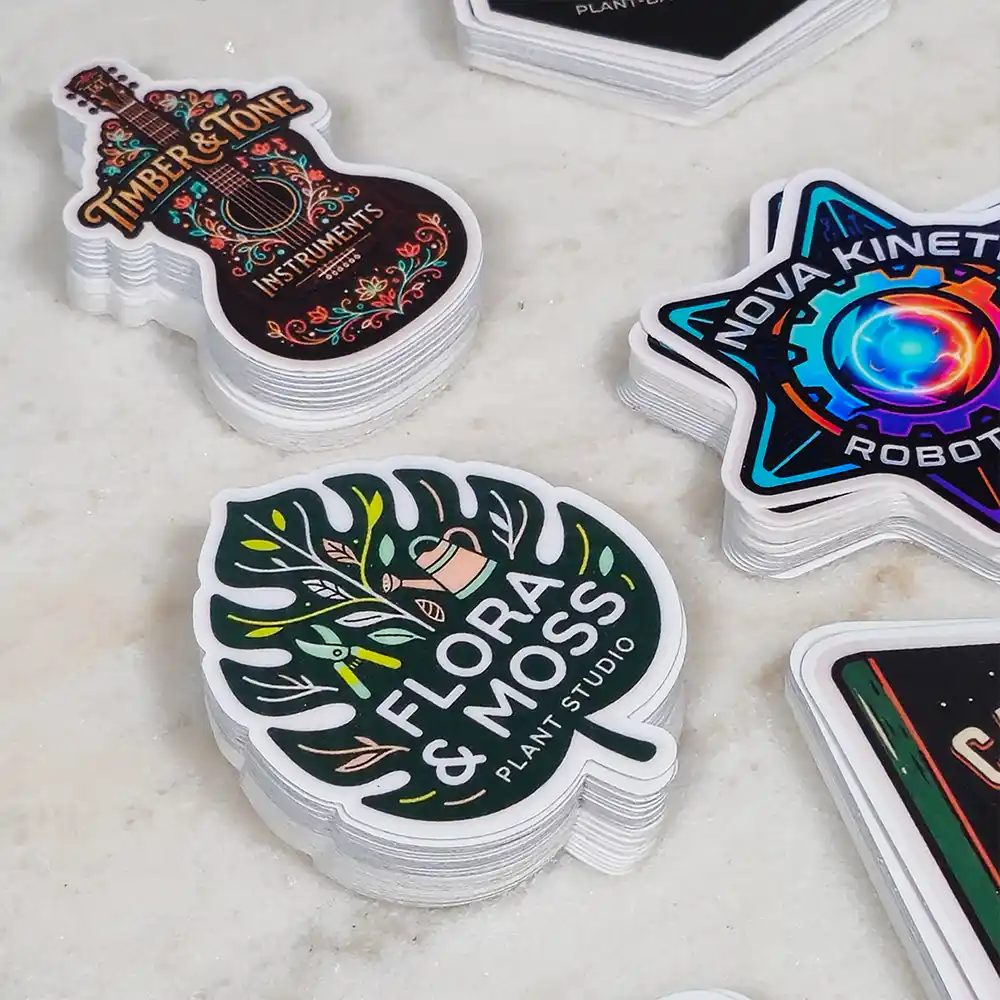
Promo Stickers Kiss/Die-Cut are custom-sized from 1" x 1" to 6" x 6" and available in multiple materials and finishes. For vehicle promo use, the more practical range is often 4" x 4" up to 6" x 6", plus wider bumper-style formats built with the same custom width x height sizing system. They’re general promotional stickers, not automotive service reminder products, and can also be used on personal items and other promotional applications.
Where vehicle promo stickers work best
For this type of application, larger stickers are usually easier to notice and easier to read. That matters when the goal is everyday brand visibility rather than a tiny logo placement.
Common placements include:
- Rear bumpers: A small bumper sticker format can suit a short message, logo or web address.
- Trunks and rear panels: Dealer ID stickers are commonly applied by garages and dealerships to the trunk or rear body panel of a vehicle they have serviced.
- Tailgates on trucks or vans: A larger promo sticker can help keep branding visible without the cost of a full vehicle wrap.
- Other flat rear vehicle panels: Choose a clear, unobstructed area that stays away from handles, seams, cameras, sensors and lights.
These are general placement ideas, not a guarantee that every sticker material is suitable for every vehicle surface. Painted panels, curved bumpers and textured plastics can all behave differently. Check that the selected material is appropriate for the intended surface, and keep stickers away from lights, sensors, plates and any legally restricted areas.
Keep the message simple and readable
Vehicle promo stickers still work best when the message is short. Decide what the viewer should notice first, then include only the information that supports that goal.
For example, a bumper sticker or dealer ID sticker might feature:
- Your logo or company name
- A short service description
- A phone number or website, if it remains legible at the chosen size
Before ordering, view your design at its actual dimensions. Fine lettering, narrow lines and crowded contact details can still become hard to read, even on a larger sticker. A simple, high-contrast design is often the most practical choice for a vehicle promo decal.
For a fleet, consistency matters. Use the same logo, colours and information hierarchy across vehicles. If different vehicle shapes require different placements, keep the design itself consistent so customers can still recognize your brand.
Choosing a sticker material for your vehicle
The best material depends on the surface and whether you want the sticker to stay in place or be easier to remove. The product page offers these options:
- Permanent Vinyl: An everyday durability option.
- Removable / Low Tack Vinyl: A lower-tack choice to consider when easier removal is important.
- Repositionable Vinyl: Opaque white vinyl that can be repositioned.
- High Tack Vinyl: Opaque white vinyl with a strong grip for curved or textured surfaces.
- Static Cling: An option for applications where you prefer not to use adhesive.
- Silicone Back PET Film: Uses micro-suction technology, so no glue is needed.
- Reflective Vinyl: A reflective option for visibility in low light.
- Holographic Vinyl: A rainbow-shifting finish for a more noticeable look.
If you use a leased vehicle, consider whether you may need to remove the sticker later and choose accordingly. A removable option may be worth considering, but removal results can depend on the surface and its condition. For a vehicle that will carry the branding long-term, Permanent Vinyl is often the practical everyday choice, while High Tack Vinyl may help on more demanding surfaces.
Reflective Vinyl can add visibility in low light, but a sticker is not a substitute for required vehicle lighting or safety markings. Make sure the placement does not cover lights or interfere with safe operation.
Die-cut or kiss-cut: what’s the difference?
StickerPlanet.ca offers both die-cut and kiss-cut options:
- Die-cut stickers are cut to the outline of the design.
- Kiss-cut stickers are cut through the sticker layer while leaving it on an easy-peel backing sheet.
For a bumper sticker or dealer ID sticker, the preferred cut depends on the artwork and how you want to handle the sticker. The product page also offers custom shapes as well as standard square or round designs.
You can choose from no lamination, Glossy, Matte, Glossy UV or Holographic Glitter lamination. The listing describes the stickers as full-colour, waterproof and fade-resistant. StickerPlanet.ca uses eco-solvent inks for all stickers. Review the material and finish options on the product page when deciding what suits your application.

Prepare the surface before applying a sticker
A clean surface helps you get a neater application. Dirt, grease, wax or moisture can affect how well a sticker sits, so take time to prepare the area.
For a basic preparation routine:
- Choose a suitable location. Avoid panel gaps, handles, trim, deep creases and textured areas unless the selected material is appropriate for that surface.
- Wash away dirt and road film. Use a suitable cleaning method for the vehicle surface.
- Remove residue. Wax, oils or polish can interfere with adhesion. Use a cleaner that is compatible with the vehicle finish, and test it in an inconspicuous area first.
- Let the surface dry completely. Pay attention to seams and edges where water can collect.
- Position the sticker before applying it. Check alignment and visibility, then apply it carefully without stretching the material.
For more detailed guidance, consult the Avery Dennison substrate cleaning and preparation guide. Follow the instructions relevant to your vehicle surface and the sticker material. If the vehicle has a special coating, a recently refinished panel or a treated window, confirm compatibility before application.
Promotional pricing
The advertised pricing below gives you several sizes and quantities to consider for a vehicle promo sticker project. While the full custom size range runs from 1" x 1" to 6" x 6", vehicle applications are often better suited to 4" x 4" to 6" x 6" square formats or wider bumper-style layouts ordered through the same custom width x height sizing system.
| Sticker size | Quantity | Advertised price |
|---|---|---|
| 1" x 1" | 330 | $29 |
| 2" x 2" | 100 | $29 |
| 3" x 3" | 100 | $49 |
| 4" x 4" | 100 | $69 |
| 5" x 5" | 100 | $99 |
| 6" x 6" | 100 | $119 |
These are the provided promotional examples, with free Canadian shipping included. The product page also lists quantities from 5 to 10,000, with best value at 50, 100 and 200. Review the product page for current options, custom width x height sizing details and order information. There are no hidden costs.
Printed in Canada, with free Canadian shipping
Promo Stickers Kiss/Die-Cut are printed in-house in Canada and shipped in-house in Canada, with free Canadian shipping. That makes them a practical option for a local business ordering a first batch or a garage or dealership preparing promo stickers for multiple vehicles.
To start, decide whether the sticker will be used as a bumper sticker or a trunk/rear-panel dealer ID sticker, choose a design that remains legible at the finished size, and select a material suited to the surface and your removal needs. Then review the available cut and lamination options.
Explore sizes, materials, finishes and order quantities on the Promo Stickers Kiss/Die-Cut product page.